Pages

Pages

Tuesday 25 December 2012

Obligatory Christmas nails

I haven't been posting much lately. I'm just so tired these days... no matter how much I sleep :/ dunno what's wrong with me haha I must be getting old

Here is what I'm probably going to be wearing for Christmas... debating whether or not to redo my nails right now. There is some pretty bad tip wear on my right hand and a large chip on my right thumb but I just did my nails last night and am feeling a bit lazy. I didn't do any cute nail art mainly because I can't draw. Also I'm not really into Christmas. Not that I have anything against Christmas I just don't get very excited about it. I absolutely HATE Christmas music and I feel like Christmas shopping is such a chore sometimes. I'm always shopping at the very last minute and totally stressed. My boyfriend keeps calling me the Grinch. Anyway I thought about doing red and green but just went with red and some glitter in case I didn't change my nails again for a while. I didn't want to have totally Christmas nails after Christmas! 

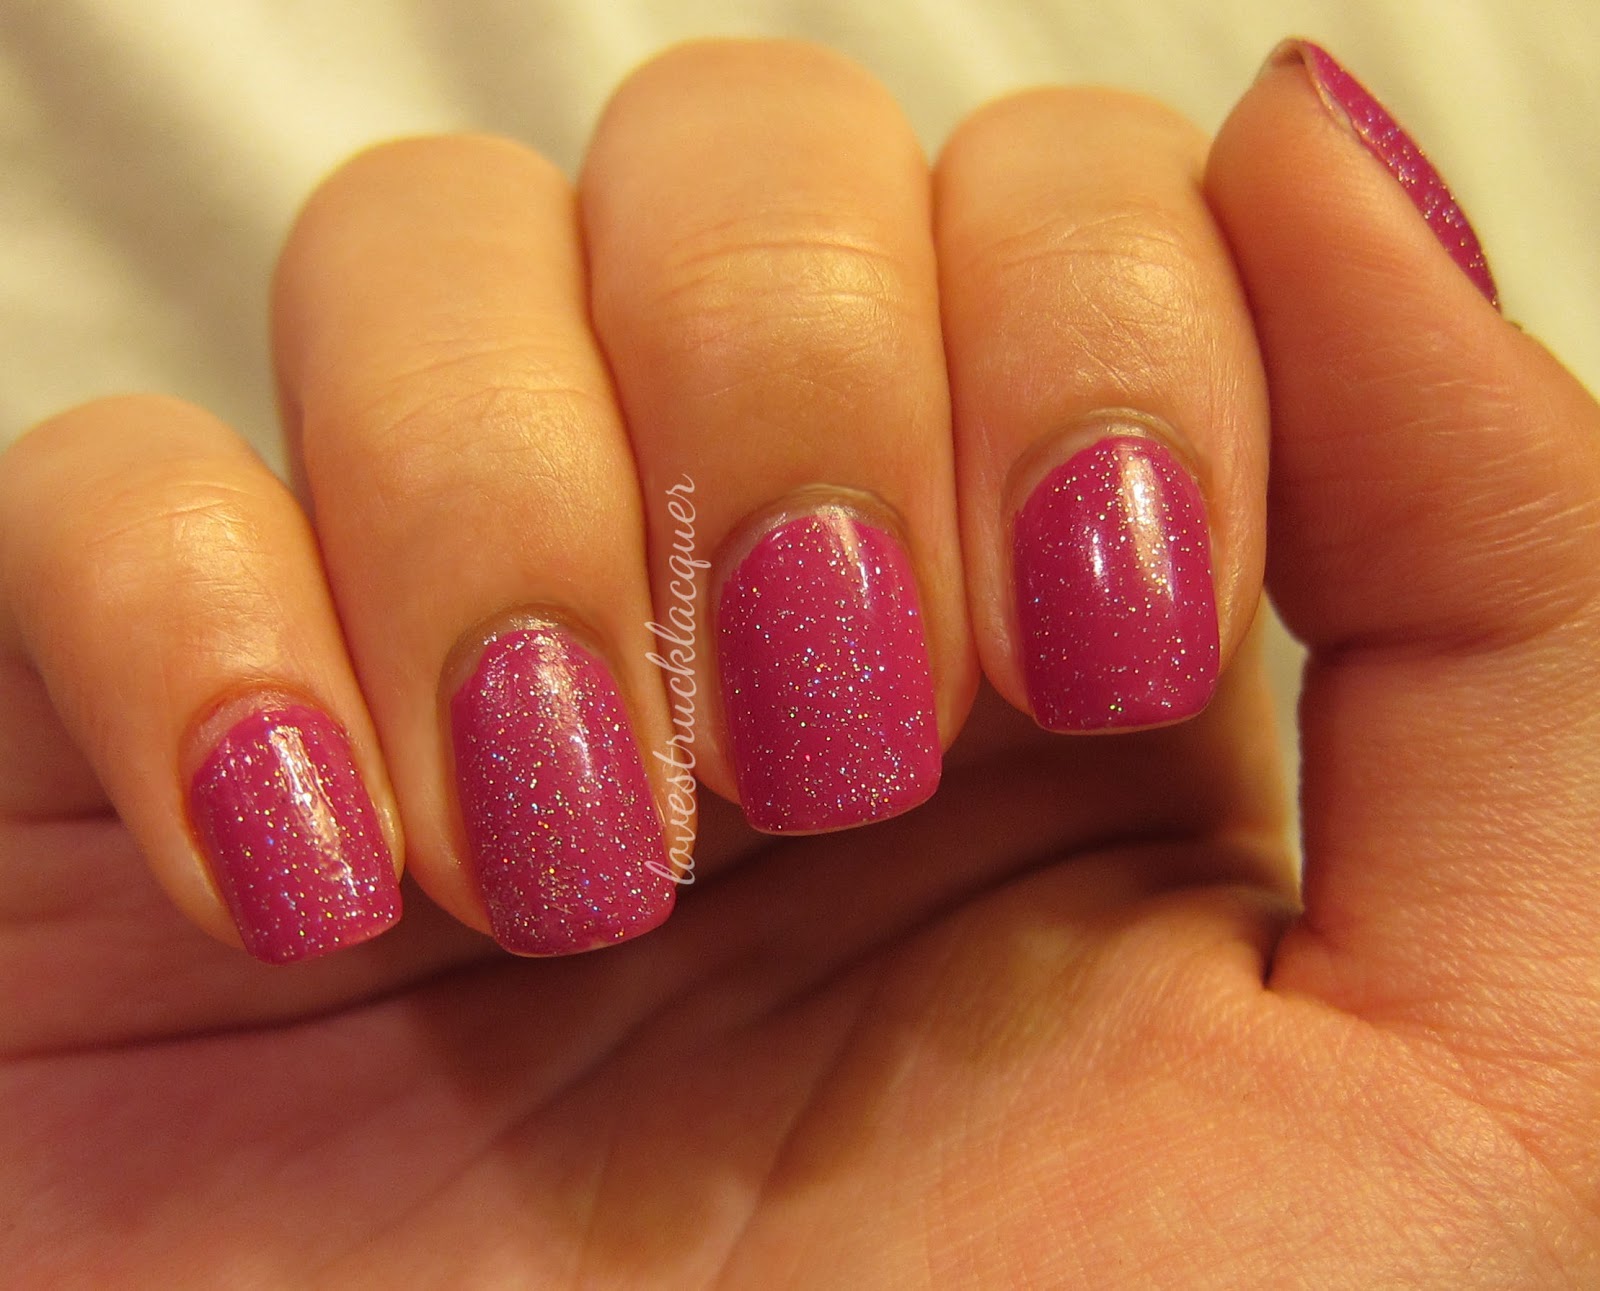
still trying to fiddle with the lighting in my light box. My skin looks so pale and washed out here but at least the polish is the right color


OPI - Big Apple Red (2 coats)

Accent nail: 1 coat of OPI Excuse Moi over 1 coat OPI Big Apple Red

OPI Big Apple Red is a crelly (jelly finish but more opaque than true jelly). It was thin but easy to control and each coat was extremely even. There was still some visible nail line at 2 coats but I was too lazy to do a third. It is not very noticeable normally just under bright light. Underneath Excuse Moi I didn't feel that more coats were necessary since the dense glitter would mostly cover the nail and hide any VNL. 

OPI Excuse Moi is a pink tinted base with silver and pink microglitter and medium sized glitter in various colors. I didn't expect the pink tinted base to change the color of the base color this much. At a distance it almost looks more like Valentine's Day :(. But I got a fair amount of green glitter on most of my accent nails so I think it can still pass for Christmas. 

Tuesday 18 December 2012

HELP!!! my nails keep breaking when I go skiing!


I went skiing on Sunday and broke 4 (yes FOUR) of my finger nails + 1 toe nail!!! :'(

This happened when I went skiing last year too with completely different polish on (but at least that time it was only 1 nail so I didn't think too much of it). I really can't figure out what it is about skiing that makes them break. 

It's really strange because it's almost always on my left hand (my non-dominant hand - I am right handed). 

Also my nails don't break very often normally. I always use nail strengthenng base coat (usually Essie Grow Stronger, sometmes OPI Nail Envy). I keep my nails polished to protect them (please don't tell me to take a break to let my nails "breathe" they break a lot less when I keep them polished). They aren't even very long right now! They were way longer in the summer...

Maybe the cold makes them crack or something? But I have gloves on the entire time and my hands never feel cold. And then I take off my gloves when I get inside and SURPRISE! Broken nails. 

I do need to carry my equipment around but again I have thick ski gloves on so that should prevent me from hitting my nails on anything and causing breakage. And again it is on my non-dominant hand usually.

My left thumb and pointer had corners missing when I took off my gloves as you can see. I noticed my thumb was broken when we went inside to take a break for lunch. I noticed my index finger broken at dinner. At first I just thought the polish chipped on my middle finger nail, but it felt like it had a snag so I went to file it... and as I was filing it a piece of my nail came off. Same thing happened with my right pointer nail although it was a much smaller piece.

Any suggestions would be appreciated! Thanks!

Friday 14 December 2012

"Your nails look like cupcakes!"


 2 coats Revlon Sheer Sugar + 1 dabbed coat of Claire's Love It glitter + 1 coat Revlon Sheer Sugar

Please click "read more" for more pictures and review.

Wednesday 28 November 2012

Essie - Dive Bar

Essie - Dive Bar (2 coats)
base: Essie - Grow Stronger, top coat: Seche Vite

I saw this at Walgreens in Vegas a while ago and picked it up. Essie is a few dollars cheaper in the states than it is here in Canada so I bought this on a whim. Usually I will look at swatches/reviews on my phone before purchasing but since I was on vacation I didn't want to use 3G since it would be really expensive with roaming. In the bottle, this looks like a beautiful dark teal shimmer with a purple duochrome shift. Unfortunately, the purple duochrome shift does not show up at all on the nail. You can see it in the bottle shot below.


Next time I wear this I think I'll try Orly Royal Velvet on top to get a purple duochrome. Although I was disappointed that the polish didn't have the purple duochrome shift I was hoping for, I still really like this polish overall. It is a nice shimmery dark teal that can look a bit black at the edges but glows in the middle of the nail when the light hits it. It is not so dark that it is almost black though thanks to the shimmer. It can look more blue or more green depending on the lighting which makes it more interesting. 

As with all other Essie polishes I've tried, application was excellent. The polish was the perfect consistency - not too thick or too thin and very easy to control. They also have an amazing brush that is not too wide or too thin for me. I think I only had to do clean up on 2 nails! 

Wear time with this polish was insane. I've been wearing this for a week now and I still don't have any chips! (I accidentally smudged my pinky while it was still wet if you were noticing that spot). There is a teeny bit of tip wear but much much less than usual. It has lost most of it's gloss and the shimmer is not very noticeable anymore. Reapplying top coat would probably restore the gloss and shimmer. However, I think if people didn't know what polish you were wearing they would just think that the polish was always that way and wouldn't know that you've had it on forever like me. I've been feeling like I'm starting to get sick so I've been really tired and just way too lazy to change my polish. I am getting bored of this one though (I usually change my polish every 3-4 days) so I will probably remove it in the next few days even if it doesn't chip by then.

How long do you usually wear a polish before changing it? What is your personal record for most time with the same mani? Any other recommendations for long wearing polishes?

Thanks for reading! :)

Friday 23 November 2012

Blue leopard print on black inspired by F21 skirt


OPI - Black Onyx (2 coats)
Stamping Plate: Konad m57
Stamping Polish: Orly - Sweet Peacock

Accent Nail
Orly - Sweet Peacock (2 coats)
China Glaze - Dorothy Who? (1 coat)

Base coat: Essie - Grow Stronger
Top coat: Seche Vite

I saw this mini skirt and loved the print but couldn't really see myself wearing it. So I took a picture of it and turned it into a mani instead! Here is a picture I snapped of it. The skirt was at Forever 21 in Fashion Show Mall in Las Vegas mid October. I never got around to posting this one!


I love the metallic blue on black leopard print! I originally wanted to use OPI's Unfor-Greta-bly Blue since it was a good match for the skirt color. Unfortunately, it was not opaque enough to work for stamping. Peacock worked much better but the print could only be seen when the light hit it. It just looked like dark blue shimmer from far away. I tried to layer Peacock under a silver polish on my stamping plate, hoping that when I stamped it would be more opaque with silver behind it. Unfortunately that didn't work since the stamper wouldn't consistently pick up both layers of polish off the plate.  I wish there were some way to make polishes stamp more opaque... I don't have hundreds of polishes in my stash like other nail bloggers :( ...at least not yet... 

I wasn't very happy with the way Peacock wore either. I found that it chipped off the next day in thin, flaky layers. (I didn't apply it any differently than any other polish and the rest of my nails were fine so I don't think they were too dry/oily or anything.) Maybe I'll try wearing it with a different base/top coat next time and see if that helps.

Also... I think this may be the first time I've ever done accent nails! I did a mixed mani before but I don't usually do accent nails since I tend to like having all my nails exactly the same. I did accent nails this time though because konad m57 is not big enough to cover my thumb nails so I decided not to stamp them. I painted them with Peacock and Dorothy Who? instead. I did the same for my ring fingers so that it was more integrated into the mani and I wouldn't just have mismatched thumbs.

What do you think of accent nails?

Have you taken inspiration from fashion before for a mani? Leave a link I would love to see it!

Wednesday 21 November 2012

China Glaze - Stone Cold matte / glossy

2 coats over Essie Grow Stronger. No top coat.

This polish is from the Hunger Games collection and represents District 2 (Masonry). I've had this polish since it came out back in the spring but never wore it since it didn't feel very spring to me. 

I really love the color and finish of this polish. It is technically a matte but has silver shimmer in it which gives it a nice sheen in the light. It reminds me of the OPI Suede polishes (I don't own any but looks like it has a similar finish from what I've seen on other's blogs). 

In terms of formula this dries extremely fast which is typical for matte finish polishes. It is quite opaque so it could be a one coater if you are very careful. You would need to be careful not to go over any spot twice, or go over it very quickly before it starts to dry. Otherwise if you go over a spot again while it's semi-dry it will drag and create a bald spot. I unfortunately wasn't fast enough so I needed a second coat once it was fully dry to fix the bald spots and lumpiness. 

I was annoyed that although it seemed 100% dry (felt dry, lost it's shine and became matte) it still dented really easily half an hour after painting. There is a bit missing on my ring finger near the cuticle. On my right hand, the polish on a few nails became pushed back from the edge. I ended up with a bit of white at the tip and wrinkled polish behind it. It was weird. (You can't see this in the picture below because one of my nails broke the next day so I trimmed them all before taking the picture below.) I'm not sure if polish maybe does that normally without Seche Vite? I haven't worn a mani without Seche Vite in probably 3 years lol. I don't think I would've got into nail polish if it weren't for the magic of Seche Vite! Also the tip wear with this polish was atrocious. But again, maybe it was the lack of Seche Vite and not the polish itself. I can't make an accurate judgment since I never wear polish without Seche Vite. I really love this polish but don't know if I would wear it often because of the chipping/tip wear I experienced with it. It would definitely be on my list of favorites if I could figure out a way to make it last longer while keeping the same look. I tried to add Deborah Lippmann Flat Top matte top coat over it since I've found that always lasts about a week without chipping, but it took away the pretty sheen and just made it a flat gray.

Below I've shown it glossy. I applied Gelous over my ring and pointer nails. I'm not sure how, but the Gelous actually dragged off some polish in one spot. I applied it a DAY (yes full 24 hours!) after I originally applied the polish. I picked a picture where the shine hides the bald spot. Also because I broke a nail I trimmed them before taking this picture so you can't see the horrible tip wear I was talking about earlier. 


Personally, I prefer it without anything on top of it. I love the subtle sheen from the shimmer. With a glossy top coat it looks darker and the shimmer definitely comes through more. It definitely looks nice glossy as well but I prefer it's original finish since it's more unique.

Which do you prefer? Matte or glossy?

Any suggestions on how I can get this beautiful polish to last longer without chipping?

Wednesday 14 November 2012

Purple Saran Wrap Mani (First Attempt)


Polishes used:

Orly - Lollipop (base - light pink/lavender creme)

Nicole by OPI - Light a Candle (first color - light purple tinted silver)
China Glaze - Coconut Kiss (top color - grape purple)


This is my first time doing Saran Wrap nails. I originally watched Chelsea's video to get an idea of how to do this technique, but ended up changing it quite a bit. She paints her nails one at a time and then uses the saran wrap immediately to take off some polish and make the pattern. I prefer putting a few drops of polish on a stamping plate, then dipping into the puddle of polish, and then dabbing that onto the nail. I found this gives a more intricate, finer pattern. I also didn't like using the saran wrap. I found that it was a bit sticky, and took off too much polish. I tried using tissue like Rebecca did but the tissue I was using was really soft and ended up flattening out really easily on the nail so the pattern from the folds wasn't as visible as I wanted. It ended up looking like I just sponged some parts of my nails. I ended up using the wrapper from a pad (yes lol THOSE PADS - the ones us lucky girls get to use a few days per month) and found that this worked the best for the finer more intricate pattern that I wanted. The wrapper was very thin paper and very crinkly. 

Going into this mani, I originally wanted to do a metallic light purple color on pink. I imagined it being really pretty in my head and thought it would be along the lines of Bregje's work. I love how she stamps with similar colors and it's very subtle and understated and pretty in that way. Unfortunately, it just looked like my nails were a weird dirty silver gray color after my first round of dabbing. I think because the pattern doesn't have crisp lines it's hard to see the pattern when the colors are so similar and it just becomes one color especially at arms length. It was getting really late so my only hope of fixing my mani was adding another color on top. Coconut Kiss worked perfectly with this technique. Since it's a two-coater, I could go over spots I wasn't happy with and they would become darker than other spots and create a cool pattern that way. I would definitely recommend using two or three coater polishes that are somewhat sheer on the first coat as your top color for this technique. When I was using Light a Candle, if I went over a spot too many times the color would just take over, making my nail a solid color without any pattern. You can barely see the base of Orly Lollipop anymore. I think the only nail where I could clearly see all three colors was my thumb shown below. 


I think this is a really fun technique. It's very easy yet creates stunning nail patterns. It's also great for me right now because several of my nails are splitting into layers and I don't want to file/buff them out too much because it would weaken the nail. The layers show through creme and shimmer finishes and make my nail look lumpy and I need some kind of pattern to hide it. I had been using chunky glitter for this purpose but it's really a pain in the behind to remove. I think this technique would also be good to "refresh" a mani by hiding minor chips when you don't have time to redo your nails completely.

Sunday 11 November 2012

Inspired by Zoya Blaze

I bought OPI’s Metallic 4 Life when it came out on impulse, thinking it looked amazing in the bottle. As I was applying it I thought “hmm... wouldn’t this look similar to a black creme with Essie Set in Stones on top?” I regretted buying Metallic 4 Life because of that. Sure a black creme + Essie Set in Stones probably wouldn’t be an exact dupe for Metallic 4 Life, but it probably would’ve been similar enough to not bother buying Metallic 4 Life. (I haven't actually tried this yet)

So when I saw Zoya’s Ornate 2012 collection I immediately thought the 3 with scattered holo effect (Aurora, Blaze, Storm) were gorgeous... BUT I thought nope not falling for that again! I decided since I already owned a scattered holo topcoat that I would try to recreate the look. He's my attempt to recreate Blaze.


OPI - Dim Sum Plum (2 coats)

China Glaze - Fairy Dust (1 coat)
top coat: Seche Vite, base coat: Essie - Grow Stronger


blurry shot to better show the holo effect:


I took these pictures under bright lighting to capture the holo which made the base color look lighter. Unfortunately I don’t know how to use photoshop well enough yet to fix this. I have included a cell phone picture as well for a lower quality but more color accurate photo:


If you are looking at Scrangie's pictures then my attempt at recreation is really off. Scrangie's swatch looks really red. I was looking at Chalkboard Nails' swatch originally which looks more like a raspberry color.

Since Zoya Blaze has holo mixed into its base, there is much more depth to it vs putting holo over a similarly colored creme as I have here. You can see this best in Chalkboard Nails' swatch. So I still want Zoya Blaze but it's annoying for me to get Zoya since no stores that I know of around here sell it and I don't want to pay for shipping for one bottle of polish. I could buy more and get free shipping BUT I am trying really really hard not to buy anymore polish right now...... Yeah we'll see how that goes haha

Saturday 3 November 2012

Orly Snowcone gradient with Essie Set in Stones (luxeffects)

Sorry dear readers I've been really really busy :'( my poor blog has been abandoned for 2 weeks now. Anyway I would let you know what I'm up to but I'm not sure who's reading this... I'll let you know if/when it hopefully works out! ;)

Anyway onto the post...


Orly - Snowcone (1 coat)
Essie - Set in Stones (Luxeffects) (1-2 coats)


Used Orly Snowcone again because it was such an amazing one coater! I'm really impressed that such a light polish manages to be a one coater (needed to go over a few spots twice but I'll still count it as a one coater). I was planning on just leaving this on it's own and calling it a night but the nail bandage I had on underneath was showing so I needed something with texture to hide it. I thought about crackle but didn't want to use it since the trend seems pretty much over. So I went with chunky glitter instead and I'm pretty happy with the results. It still looks weird like there's multiple layers of polish in my pictures (right side of middle finger nail) since it's such a close up shot but in real life it wasn't noticeable. The nail bandage unfortunately didn't work at all and so that's why my nails have been much shorter lately :( This is quite an old post but like I said I've been really busy...

I wanted a glitter gradient but was too lazy to use a sponge so it didn't turn out as nice as I had hoped. Oh well I guess that's what I get for being lazy. I'll redo it sometime. For the glitter gradient I went over the entire nail with Set in Stones once and then reapplied to the tips only using a dabbing method. I ended up getting some chunky glitter by the cuticle which ruined the gradient effect a bit. I hate how those chunky bits only seem to appear where I don't want them lol. When I do want them I have to dab like crazy. 

Sunday 21 October 2012

Pink Indie-esque glitter layering experiment


Orly - Lollipop (2 coats)
Milani - Lavender (1 coat)
Revlon - Popular aka Starry Night (1 coat)
Essie - Grow Stronger as base, Seche Vite after Milani Lavender and again after Revlon Popular

I was originally going to wear Orly Lollipop and Milani Lavender together but somehow it just didn't look right when I put Milani Lavender on. I can't really pinpoint and describe what was wrong with it - I just wasn't feeling it at all. It was really late and I had to work the next day. I already stayed up way later than I was supposed to trying to scrub off the glitter from my last manicure so redoing my nails wasn't an option. I originally thought of adding matte top coat so the glitter wouldn't be so blaring and shiny but I didn't think that mattifying it would really do it for me. My next thought was glitter sandwich so I threw Revlon Popular over this. I'm really loving the end result. I think it looks like something an Indie polish brand would make. I can't think of a specific Indie polish that looks like this, but I think it has that milky glitter sandwich kind of look to it. 

Orly Lollipop is a very pigmented light purple/pink creme. It is a bit thick and goes on lumpy on the first coat. It was fully opaque and smoothed out at two coats. Milani Lavender is purple/blue large hex glitter with fine purple glitter in a clear base. The large hex glitters are purple but flash more blue under certain lighting. It applied quite well and evenly for the most part. I should have gone over that one side of my ring finger again and it's really bothering me now. Oh well. Revlon Popular is sheer milky light purple/pink with fine silver shimmer and larger silver hex glitters. See my post on Revlon Popular on its own here.

I hesitated a lot before posting the in progress pictures below. Like I said, I was in a huge rush when I was doing this mani. I didn't have time to clean up before taking these so please excuse the polish all over my skin. I also didn't bother pulling out the light box for these so the lighting isn't that great either. Btw normally my painting isn't this bad but I'm right handed so this was painted with my non-dominant hand. I normally use my left hand for nail pictures but I broke a nail on my left hand so I'm taking pictures of my right hand until it grows out. Anyway here are the in progress pictures.

Orly Lollipop (2) + Milani Lavender (1) + Seche Vite

Orly Lollipop (2) + Milani Lavender (1) + Seche Vite + Revlon Popular (1) on index finger only

Wednesday 17 October 2012

JENsations Sticks 'n Stones over Essie Mojito Madness


JENsations - Sticks 'n Stones (1)
Essie - Mojito Madness (2)
Essie Grow Stronger as base, Gelous on top (2)

I was really behind on my nail blog reading list before I went on vacation. I finally caught up and realized that October is Depression Awareness month. The color for Depression Awareness is green and many nail bloggers have posted green manis in support. I happen to be wearing green nail polish anyway so here is my late post for Depression Awareness month. Please read Scrangie's post about depression for more information. As a psych major I probably should be writing my own but I'm a bit short on time and I feel like her post covered everything and was quite moving.

Anyway on to the nails. I had much better luck with Sticks 'n Stones this time than I did the first time I used it. Sticks 'n Stones is another Indie polish very similar to the famous Connect the Dots by the now infamous Lynnderella. It consists of black and white glitter in a variety of shapes: very small circles, small hexes, medium squares, bars, and large hexes. The base is clear with some subtle shimmer, The first time I used this polish I found I had to dab it on in order to get good coverage. This time, I kind of stirred the polish with the brush before each nail to get more glitter on the brush. I found that this way I usually got a good amount of glitter coverage on the first try, and didn't have too much clear base on my nails. On my middle nail however, the glitter kept sliding to the tips of my nails and I tried to prod the glitter around to fix it. This made the clear coat a bit lumpy and you can see this in my pictures. It's not too noticeable in real life however. I also didn't have any issues with the large hexagon glitter pieces lifting off this time. Only one of the bar glitters came off on its own. I think the curling and lifting was due to using Seche Vite on the glitter.

Essie Mojito Madness is a gorgeous Kelly green creme. It applied well in two thin coats. The first coat was a bit sheer and lumpy and looked like it would be a three-coater, but everything evened out at two coats. I think it worked really well as a base color for Sticks 'n Stones. Both the white and black pieces really stood out. 

Sunday 14 October 2012

JENsations - Rainbow Sprinkles over China Glaze - Coconut Kiss


JENsations - Rainbow Sprinkles (1 coat)
China Glaze - Coconut Kiss (2 coats)
Essie - Grow Stronger as base, Seche Vite (1), Gelous (1) on top

Rainbow Sprinkles is a very fun glitter. It is made up of very small round glitters, medium sized square and hexagon glitters, and larger hexagon glitters in a variety of colors. I ended up with mostly red, green, and blue on my nails but there is also teal, yellow, white, purple, and pink. Rainbow Sprinkles applied much more easily than Sticks n Stones (also by JENsations).    For the most part, the glitter came off the brush easily and covered evenly. There were a few spots that I had to go over again, but dabbing this glitter on was not necessary. Seche Vite doesn't really seem to work well with JENsatoins. I think maybe Seche Vite is making the glitters curl at the edges since it can shrink when it dries sometimes. I think that may be why some of the glitters in Sticks n Stones lifted off last time I wore it. Rainbow Glitter became a bit bumpy a few hours after applying Seche Vite, so I applied Gelous over it. In those few hours however a few of the glitters had fallen off so I had a few glitter shaped indents on my nails. I will need to find a new glitter topcoat :(

I don't think I made the best choice when picking a base color for Rainbow Sprinkles. The base color is pretty much the same color as the purple glitters so they didn't show up in this mani. Also, the base color is about the same darkness as the glitters so they don't stand out as much. Next time I'll try Rainbow Sprinkles over a light color (like Oooh Shinies), or maybe black (like Fashion Polish). 

I chose Coconut Kiss because I wore this mani when I went on vacation to Las Vegas for 5 days. I wanted something fun for Vegas and I knew that Coconut Kiss usually lasts about a week before chipping. JENsations Sticks n Stones also lasted quite a long time last time I wore it. The base that Jen uses is awesome in terms of not chipping! As I'm writing this, I'm at the airport now waiting for my flight back home. (This will probably be posted later though since I still have to edit pictures) I really don't want to go back home and go back to work! Boo! Anyway my nails are doing pretty well considering I've been wearing this polish for 6 days now. My thumbs both have a chip at the side of them. There is no tipwear on my other nails but the free airport wifi keeps cutting in and out and I've started to pick the polish off when it's off and I'm bored. I think this mani got a little thick with all the top coat so it's peeling off pretty easily. Don't do this kids! If the polish (especially a glitter piece) is stuck to your nail and you try to pick off the polish it can take a layer or two of your nail off with it. Anyway... I'm blabbing lol

Coconut Kiss is one of the first polishes I bought when I got really into nail polish and started taking pictures of my nails and posting them. I didn't really know where to get good nail polish at the time, especially China Glaze, but really wanted some! I saw this at a local spa and ended up buying a bottle of Coconut Kiss that they had been using for mani/pedis. It had about 2/3 left and I bought it for half regular retail price (not the best deal in hindsight since it's almost that cheap at Sally's for a new bottle anyway but oh well). The bottle is almost out now but the formula and application is still excellent. Coconut Kiss is a purple shimmer in a purple jelly type base. It is not as sheer as a jelly though and only required 2 coats for opacity. I need to pick up a new bottle next time I head to Sally's. Probably my favorite purple ever.

Friday 12 October 2012

Revlon - Popular

Revlon - Popular (2 coats)
Essie - Grow Stronger as base, Seche Vite on top


4 coats of Revlon - Popular
Essie - Grow Stronger as base, Seche Vite after third coat, Gelous after fourth coat


Popular (previously released as Starry Night) is a really light, delicate, pretty polish. It can be used to create different looks depending on how many coats you use. One coat of Popular creates a natural "your nails but better" look with glitter. I would have worn it like this originally except I hit one of my nails and had a bruise on it. (I'm so behind in posting that I've now worn it a second time already before posting it!) It was also a bit difficult to get it even at one coat. At two coats it is light pink, partially opaque, but the nail line is still visible. I really liked it at 2 coats too but again it is a bit difficult to get completely even coverage without it being thicker in some parts. At three coats it was opaque enough for me, although there was still slight VNL. I would have stopped here but when I was applying SV I accidentally dragged the pink base off some of the glitter so the glitter was bright silver (like essie set in stones). I put on a fourth coat to get back that light, airy, glitter sandwich look. I then topped it with Gelous. Unfortunately, it became a thick dough type layer that dented and moved after an hour even though the surface felt dry. I think this tends to happen when i use OPI Rapid Dry spray but then again it was also quite thick. I usually don't pull out the OPI Rapid Dry spray unless I have a lot of thick layers so it's hard to say whether it's the spray or the thick layers that causes this dough type layer that smudges/dents easily and doesn't fully dry through.

Sunday 7 October 2012

Christmas wrapping paper


Orly - Snowcone
Konad m64
stamped with Nicole by OPI - Light a Candle
Seche Vite on top, Essie Grow Stronger as base

I wasn't going for a Christmas wrapping paper look when I did this mani, but one of my coworkers said it looks like Christmas wrapping paper. And after he mentioned it... I think it totally does too! So I went with that as my title. Still really early for Christmas but oh well.

Orly Snowcone had an absolutely amazing formula! It only needed one coat! I was really impressed especially considering that it is a light creme color. The brush was thin and a little bit stiff. As long as you apply it "floating" like you would Seche Vite it is a one coater. I had to  go over a few spots again to cover but I'll still consider it a one coater. 

Nicole by OPI Light a Candle is a light purple tinted silver. When used for stamping, it just shows up silver. It stamped quite well, although I think I accidentally smudged the image a bit while stamping. I think with this image though it's not very noticeable. I didn't really like this image much when I was just looking at the plate. I like it a lot more on the nail. I'm loving the organic swirls and dots. Kind of looks like a simplified paisley print.

Thursday 20 September 2012

Essie Shine of the Times Luxeffects over Orly Lollipop


Essie - Shine of the Times (Luxeffects) 1 coat over
Orly Lollipop (2 coats)
Seche Vite on top, Essie - Grow Stronger as base


Prepare for some serious picture spam! I just couldn't limit myself to only a few pictures with this one. Shine of the Times was just too gorgeous! Keep reading for more pictures and a review of Shine of the Times and Lollipop.

I can't believe this is my first time wearing Shine of the Times. I was so excited about it when I first got it and then never ended up wearing it. I love the flakie look but don't like when Shine of the Times flashes dark green/orange/brown like it does over black. Yup call me crazy but I hate it over black. Maybe I should get a cool toned flakie instead. Anyway I  picked up Lollipop and love these two together. I finally found a color that I love under Shine of the Times. Shine of the Times flashes mostly a coral color over Lollipop. It does still flash a bit of green but it looks like a lighter green. I don't know if Lollipop underneath has changed the color of Shine of the Times or if the color contrast is just creating that illusion. It flashes more light blue/purple in low light. I can't stop staring at my nails! Here is some bottle shots and pictures taken in different lighting around my house.


Shine of the Times formula was consistent with the rest of the Luxeffects collection. It has a thick, gel like formula that was very easy to control and spread. It has many small flakes packed into a clear base. Wear time with all the Luxeffects is quite good. Usually around 5 days with only minor chip wear.

Before removing this manicure, I wanted to see what it would look like matte. I put one coat of Deborah Lippmann's Flat Top on my ring and pinky fingers to show the difference. Personally, I don't like this matte. I feel like the flakie effect is already quite subtle and matte the flakie effect almost disappears entirely.


Lollipop has been overshadowed by Shine of the Times in this post but it is quite a nice polish as well. It is very  pigmented especially for a pastel creme so you could probably get away with one coat if you are really careful and don't go over spots twice. I had issues with the brush dragging away polish if I went over the same spot twice and creating bald spots. If you want to try for only one coat paint both sides first and then a final stroke down the middle. It also helps to apply the polish "floating" like you would Seche Vite. This means that you have lots of polish on the brush, so that you are not touching the brush to your nail when you are spreading the polish. My first coat was quite lumpy, but I realized after the first coat that part of the brush was looped over. I tried to pull down on the loop and straighten it but it was stuck and wouldn't budge. I think I got a defective brush where some of the bristles were folded over when the brush was attached to the handle. I snipped the bottom of the loop and straightened out the brush before my second coat which went on much smoother. I think now that the brush is fixed, Lollipop would probably be a one coater with careful application. The other Orly polish I bought at Sally's, Snowcone (a light cornflower blue creme) is a one coater so I'm hoping this will be too when I try it again.

*EDIT: Orly Lollipop is unfortunately too thick and lumpy to be a one coater even though it is really pgimented. I have tried it again.*

Design by | SweetElectric